With the introduction of Microsoft Office 2013, PowerPoint has been significantly improved and tied with lots of useful and time-saving online services. But when it comes to creating a good presentation, it’s not just the software and the features – it’s about all those small things that pile up and make a really good impression.
Choosing the Right Aspect Ratio for Your PowerPoint
A barely noticeable feature of PowerPoint 2013 is that it automatically adjusts your presentation aspect ratio based on your current display resolution. While this is good in some cases, it’s best to think about where you will be presenting and what kind of a screen will you be provided with. The basic standards right now are 4:3, 16:9 and 16:10, with 4:3 being the most commonly used.
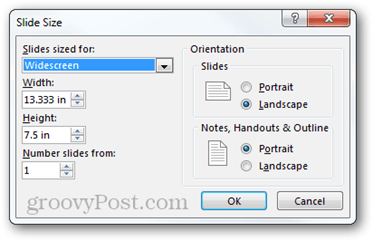
Above is a side-by-side comparison of an incorrect presentation aspect ratio and a correct one. While the difference may not seem that game changing to some, I ensure you you are better off without the annoying unused white space at the side of the screen. Filling up the entire screen allows your viewers to truly immerse into the content you are presenting. Get in touch with the people that will provide you with the presentation screen and ask them about the aspect ratio. Afterwards you can easily edit your aspect ratio settings by doing the following: For PowerPoint 2007/2010: Go to the Design tab and choose Page Setup
For PowerPoint 2013: Go to the Design tab and choose Slide Size > Custom Slide Size (or just pick between 4:3 and 16:9).
The new version of PowerPoint also has a new feature where if changing from a larger aspect ratio to a smaller one you can choose whether you want to maximize your content or ensure it will fit inside the space you’re going to allow it to use. I recommend the Ensure Fit option, since it is always best to resize your content manually and make it fill the screen the way you want to.
Finding the Template That Fits Best
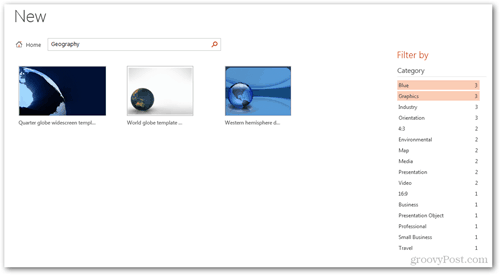
As I mentioned in the beginning of the article, if you are to create a good presentation you need to pay attention even to the smallest details. That includes the template you’re going to use and the background for each and every one of your slides. PowerPoint 2013 has a new start screen which lets you instantly grab a template from the net, as well as easily search and filter templates with ease. Here’s a great example of how nicely the template search in PowerPoint works. I found three wonderful templates for less than 20 seconds.
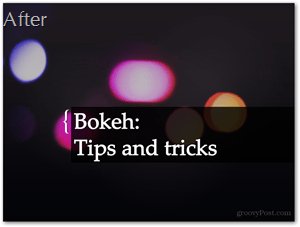
If you’re on an older version of Office or you simply can’t find what you’re looking for, it’s also a good idea to create your own background. Get creative, use every image editing tool you can think of, try experimenting with different photography techniques and tricks, and if you really want to take things to the next level, get inspired and do some hardcore editing in Photoshop. Here’s a really good example which can inspire you to create your own background and make your presentation even more unique:
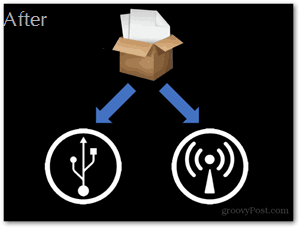
Less Text, More Visuals
This is perhaps one of the most valuable tips I can give you. Leave the text aside. If there is even the slightest bit of “computer geekness” inside of you, then you surely know that a good UI needs a lot of visual elements to make for a more pleasurable experience. Well, it’s kind of the same deal with presentations, and if you use visual elements and animations to help explain your speech and your ideas, then the audience is more likely to understand the true meaning behind what you’re saying. PowerPoint 2013 has a few perks over PowerPoint 2010 here as well, but nevertheless if you really want to get things done, even the oldest version of PowerPoint can’t stop you from doing so (if you’re ambitious enough, which is). Here’s a quick example so you can better understand what I mean:
The Right Effects at the Right Time
Personally I’m not that much of an Apple fan, but I must admit that their keynote presentations are simply amazing. The style in which they present and the effects that they use definitely play a big role in their success. The most basic tip I can give you here is to have equally dynamic transitions and effects throughout the entire presentation and to add more dramatic and epic effects only on more important slides. Here’s a quick comparison between a rather casual effect and a dramatic one:
Highlight What’s Important
A good presenter emphasizes on the more important parts of his presentation not only with the right transitions and effects, but also with short pauses and annotations which can allow the audience to fully digest the information. There are several different methods for emphasis in presentations. My personal favorite is adding an emphasis animation. When animating the separate elements on a slide, you may have noticed that aside from the entrance and exit animations, there are also a few labeled “emphasis”. To add one of these effects, make sure that the element from the slide is selected, then go to the tab Animations > Add Animation > More Emphasis Effects.
There are several different effects you can choose from, most of which you can further customize with the help of the animation pane (Animations Tab > Animation Pane). From there you can individually configure each effect’s options.
Here is an example of what you can easily achieve with the emphasis animation called “Grow With Color” and a simple motion path:
One of the other ways in which you can emphasize on something is to highlight important areas during the presentation. When viewing any PowerPoint slideshow, you may have noticed the small menu that appears at the bottom left of the screen. It contains various various different options from which you can choose to further develop your presentation. Notice the small highlighter icon (shown below – highlighter icon in Office 2010 and 2013):
With the highlighter tools (laser pointer, pen and highlighter) you can easily focus the audience’s attention to what they must see. Here’s an example with the laser pointer:
You can also work with the highlighter tools if you use presenter mode in PowerPoint. It’s a great feature which allows you to read your notes, see what’s up ahead, keep time and much more. To enable presenter mode, you need one projector and one monitor. The projector shows the audience only the presentation, while you maintain full control of everything on the monitor that only you can see. In other words (or images), here’s what the audience sees:
Here’s what you can see:
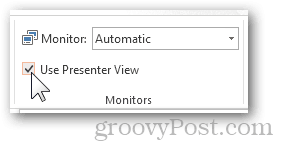
In order to enable this mode, go to the tab Slide Show and check the “Use Presenter View” option.
Another good tip I can add is to have a look at wireless presentation controllers. Logitech has some great options, and Microsoft even has a mouse with controls that are built right in. Define a budget, consider the options and buy something that suits your needs.
It’s Not Just the PowerPoint Presentation, it’s YOU!
As strange as it may sound, the final tip I can give you is not to overdo it. This is not a tip regarding how many features you use or which version of PowerPoint you use and so on. It’s just a tip to remind you that no matter how well you do things on PowerPoint, the key to true success is to be a successful presenter. Do pay the appropriate amount of attention to your actual on-screen content, but make sure to also leave plenty of time to actually work on the way you communicate with the audience, the vocabulary that you use, and the “wow” factor of your Here are a few things which are important to remember:
Be calm and act natural.Speak positively, but try not to seem overexcited.Make short gestures with your hands, but do not overdo it.Try NOT to have your notes completely memorized. Scripted presentations are beyond boring – simply improvise on-the-go and keep the conversation flowing naturally.Maintain eye contact with the audience.Include your audience in the conversation. Ask questions, make people raise their hands and have short chats with individual people. Make everyone feel involved in the entire presentation.Keep people equally focused both on you and on what’s on screen.Don’t rush through, but don’t be too slow either. Find the perfect balance of speed and accuracy and practice presenting to an imaginary audience.Throw in a joke or two, but do so only if the audience seems to be approving of the way you present and you begin to feel closer to them. A quick joke is a great method of keeping everyone’s attention and enlightening the atmosphere.
If you follow these tips and treat presentations like very serious events, I assure you that your next presentation will be one that your audience will never forget! Comment Name * Email *
Δ Save my name and email and send me emails as new comments are made to this post.


![]()
