Synergy Software
Synergy, which recently merged with Synergy+, is a free open source software that allows you to share your keyboard and mouse among several computers without VNC or a KVM switch. And because of that, you don’t get any of the screen lag or video issues that you would with VNC or the hassle of installing new hardware, such as a KVM switch. For example, as I’m writing this post, I am using the built-in keyboard on my Macbook running OS X 10.6 to type into Windows Live Writer, which is open on my EEE PC running Windows 7. In this way, I don’t have to go through the hassle of dual-booting or virtualizing in order to write up a blog post using Windows Live Writer (which doesn’t exist in macOS). Setting up Synergy is quick and easy. It’s the quickest and easiest on a Windows computer, but it’s pretty simple on Linux and OS X, too. I’ll show you how. For each platform, it all begins with downloading Synergy for your operating system. Run the installer and then see below for configuration instructions.
Setting Up Synergy in Windows as Server
If you want to use a keyboard and mouse connected to your Windows computer to control other machines, you need to run Synergy as a server. After installing Synergy, follow the steps below:
Launch Synergy.
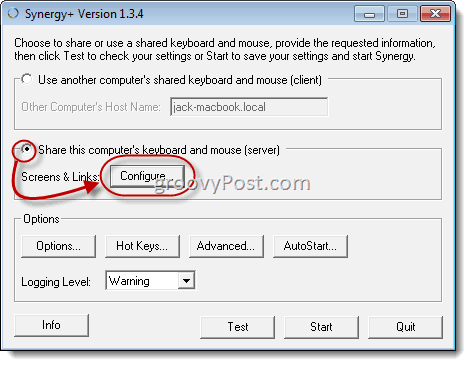
Select Share this computer’s keyboard and mouse (server).
Click the Configure button. This will bring you to the panel where you can add screens and links
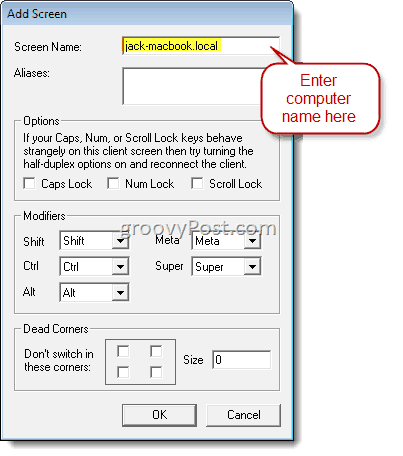
Click the + button. You’ll need to add a screen for each computer that will be using the keyboard/mouse, including the server.
Type in the Screen Name of the computer. If you’re not sure what this is, you can click on Info back in the main window. On a Mac, you can find this out by clicking the Apple menu and choosing About This Mac and More Info. It will be displayed in the top-left corner. The rest of the options can be left blank—you can return to these later if you are having issues. Repeat this step for each computer.
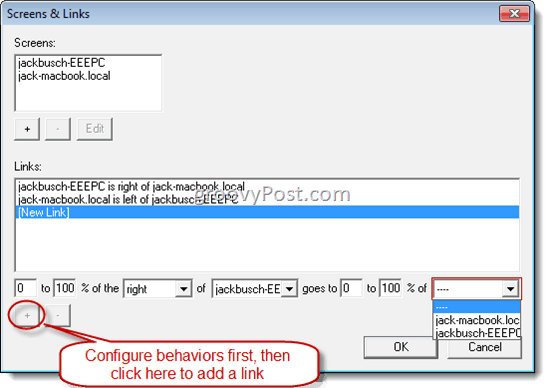
6. Once you’ve added all of your computers, begin building your links. Click the drop-down menu along the bottom of the second panel to map out the locations of the computers in relation to each other. Once you’ve chosen these options, you can click + to add the link. You’ll need, at a minimum, two links. For example, if you wanted your mouse to switch to your Macbook when it leaves the right side of your PC’s screen, you’d tell Synergy that the Macbook is to the right of the PC. But in order to get back, you’d have to make a link telling Synergy that your PC is to the left of your Macbook. When you’re done, click OK.
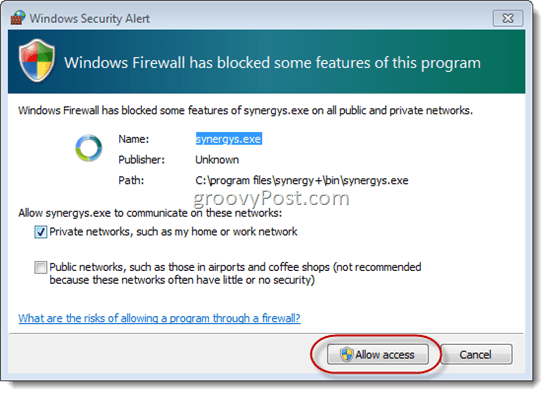
- At the main screen, click Start. Now, other computers will be able to connect as clients. If Windows warns you that a Firewall has blocked Synergy, simply click Allow.
Setting up Synergy in Windows as Client
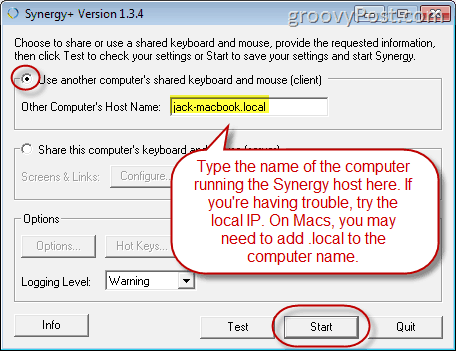
Acting as a client (i.e. allowing your computer to be controlled by another computer’s keyboard and mouse) is even easier. Simply launch Synergy, select Use another computer’s shared keyboard and mouse (client) and type the name of the server into the box and hit Start.
If this doesn’t work out for you, try using the local IP of the server machine (i.e. 192.168.1.1), which you can see by clicking Info on the server machine. For Macs, you can find your IP by going into System Preferences and clicking Network. For Macs, you may need to add .local to the end of the computer name, as in jack-macbook.local.
Setting up Synergy on a Mac or Linux Computer as a Server
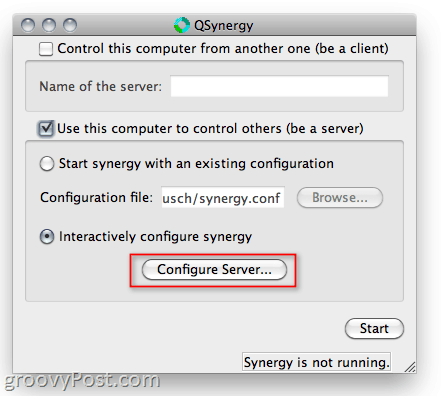
For Mac and Linux machines, there is no built-in GUI for Synergy. Luckily, there is a graphical frontend to Synergy that saves you from creating a plain text configuration file. It’s called QSynergy, and it’s free to download. Note that you’ll have to have Synergy installed as well as QSynergy. Once you have both Synergy and QSynergy installed, go ahead and launch it.
The graphical user interface in QSynergy is, in my opinion, even better than the native Synergy GUI for Windows. To act as a server, select Use this computer to control others (be a server). Next, select Interactively configure synergy and click Configure Server…
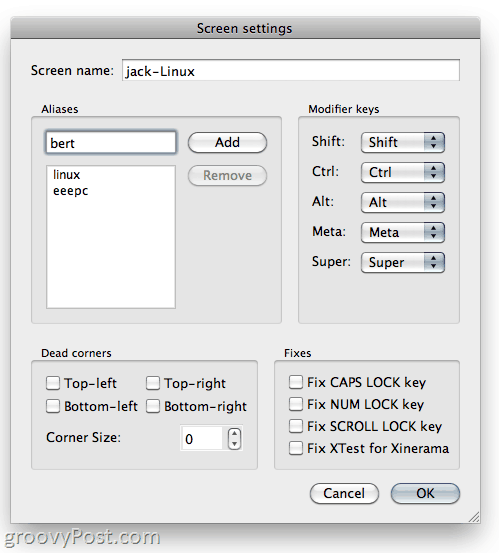
Next, drag and drop the icon in the top-right onto the grid to start mapping out the layout of your screens. Start with the machine that will be acting as a server and lay each one out on the grid.
Double-click a screen to change it’s settings. Here, you should enter the screen name (i.e. the computer name). Recall from above that you can find out the computer name by clicking Info on the Windows GUI or by going into About this Mac in OS X. If you’ll be sharing a Mac keyboard with a Windows computer, you might want to change the modifier keys, otherwise your CTRL key might not function correctly. For me, changing the ALT key to CTRL gets it working.
Add and configure screens for each computer you’ll be sharing a keyboard with. When you’re done, click OK and then Start. Now, other computers will be able to connect as clients.
Setting Up Synergy on a Mac or Linux Computer as a Client
Connecting to a Synergy server with QSynergy is easy—simply check Control this computer from another one (be a client), type in a computer name and click Start.
Auto-Starting Synergy
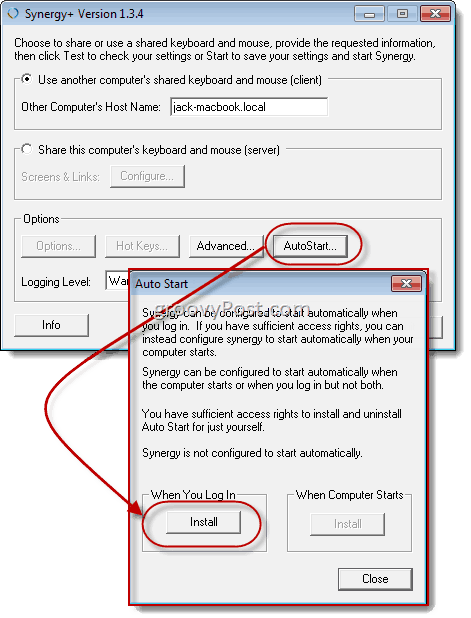
Because of security quirks, launching Synergy from a remote host or via SSH limits its functionality. As such, it’s best to launch Synergy when the operating system boots. This way, you don’t ever have to have a keyboard or mouse hooked up to your clients, which is handy for servers or multimedia PCs. For the Windows version, you can set this up by clicking AutoStart and then clicking the Install button under “When You Log In” or “When the Computer Starts.”
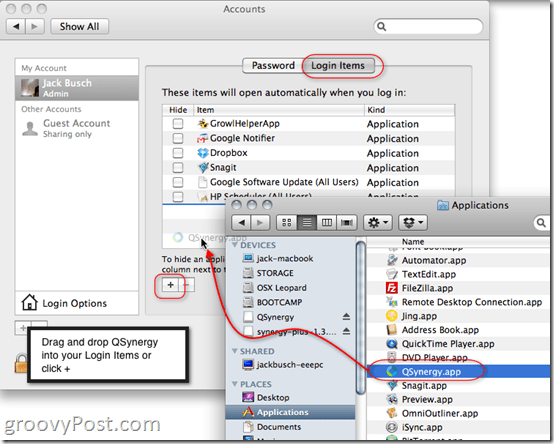
For QSynergy on Mac or Linux, you’ll find the autostart option in the Preferences pane under the QSynergy Menu. Here, you have to check Automatically start synergy when QSynergy starts and then add QSynergy to your login items. In OS X, you can add login items by going into System Preferences > Accounts and clicking Login Items. From there, you can either click the + sign or drag and drop the QSynergy icon into the Login Items window. You have to do this from the Applications folder—it won’t work from the Dock.
Conclusion
Overall, Synergy is very groovy—though it’s not without its flaws and bugs. Currently, you can’t share clipboards when OS X is the server, and there will be occasional quirks with buttons, mostly due to the nature of the different keyboard layouts and native behaviors. But most of the issues are minor or have fixes that can be tweaked in the settings with a little help from the documentation and coding community. For a free download, there’s not much to complain about here. And I totally love being able to seamlessly switch between macOS and Windows 7 using the same keyboard. Comment Name * Email *
Δ Save my name and email and send me emails as new comments are made to this post.


![]()
