None of these options offers the speed and flexibility that VLC gives you, however. While VLC is well known as a video player, it also has some basic video editing tools that allow you to change how your videos are displayed. In particular, you can use VLC to quickly rotate videos. These changes can be temporary, or you can save the file with the rotation applied. If you want to know how to rotate a video in VLC, here’s what you’ll need to do.
How to Temporarily Rotate Videos in VLC
VLC allows you to manipulate videos, including rotating them, in the player itself. These changes won’t be saved automatically, so it’s a good way to test how a video might look when you rotate it.
On Windows
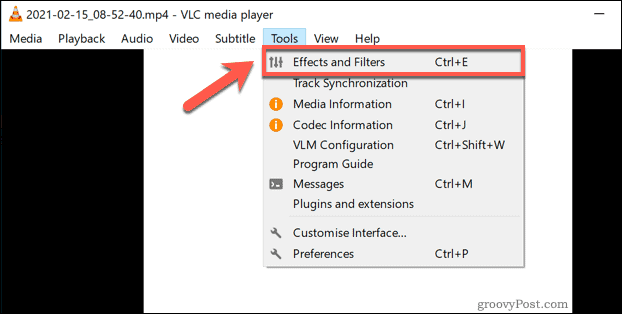
To do this in VLC on Windows, open VLC and press Media > Open File to open the file. With the video playing, press Tools > Effects and Filters to access VLC’s video editing tools and filters.
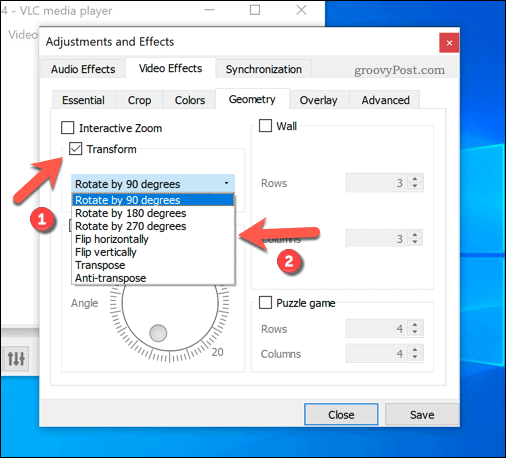
In the Adjustments and Effects window, switch to the Video Effects tab. From there, select the Geometry tab. You can rotate your video in two different ways. To use preset rotations by 90, 180, or 270 degrees, or to flip your video horizontally or vertically, press the Transform checkbox, then select one of the options (such as Rotate by 180 degrees) from the drop-down menu.
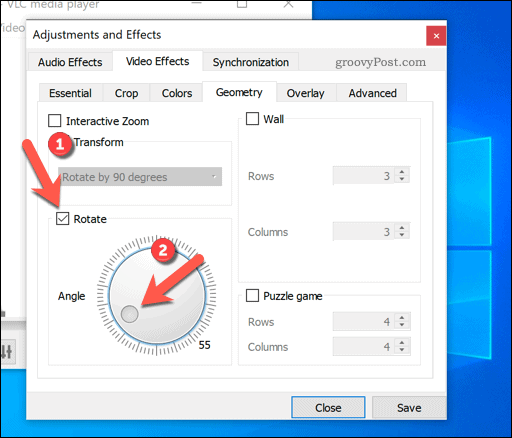
Alternatively, you can rotate your video by selecting the angle of rotation manually. To do this, press the Rotate checkbox instead, then move the circular icon below to a suitable angle. The angle of rotation will appear in the bottom-right corner.
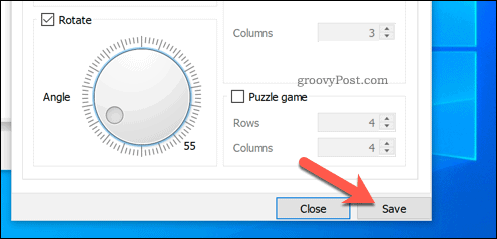
Once you’re happy with the video rotation, press Save to save your settings, then Close to close the window.
VLC will display your rotated video in the main view window, allowing you to view it at the angle you selected. The effects will remain in place for any videos you play in VLC. If you want to view other video files, you’ll need to repeat these steps and disable the rotation to view them normally.
On Mac
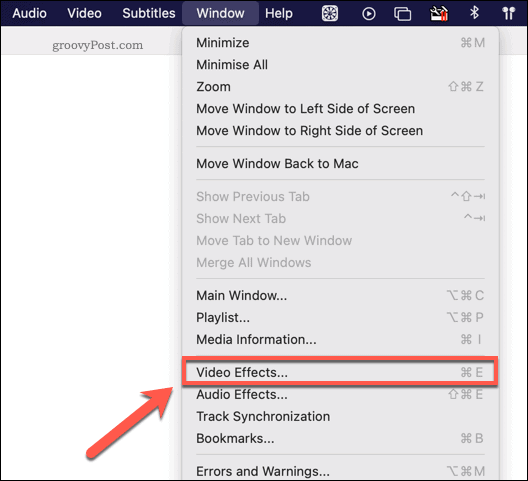
To rotate a video temporarily in VLC on Mac, you’ll need to first open the video in the VLC player by pressing File > Open File. Once the file is open, you can access VLC’s effects menu by pressing Window > Video Effects.
In the Video Effects window, press the Geometry tab to access the various options to rotate or flip your video. Unfortunately, unlike the Windows version of VLC, you can’t rotate your videos using a custom angle in VLC on Mac. To use preset options to flip or rotate it, click to enable the Transform checkbox, then select one of the available options from the drop-down menu. The changes you make are applied automatically, so close the window once they’ve been applied.
As with VLC on Windows, the effects you’ve applied will remain for any videos you play in VLC. You’ll need to repeat the steps above and uncheck the Transform checkbox to remove the filter afterwards.
Saving a Rotated Video in VLC
The steps above will rotate videos, but they apply to VLC specifically. This means that any videos you play in VLC will rotate, but the files will open as normal in other media players. If you want to save a video with a rotation in VLC, you’ll need to save the file with the rotation applied.
On Windows
To save a rotated video in VLC on Windows, start by opening your video file by pressing Media > Open File. Once the video is open, follow the steps above to add your rotation filter to VLC. With your rotation applied, you’ll need to change some settings before you can save the video. To do this, press Tools > Preferences.
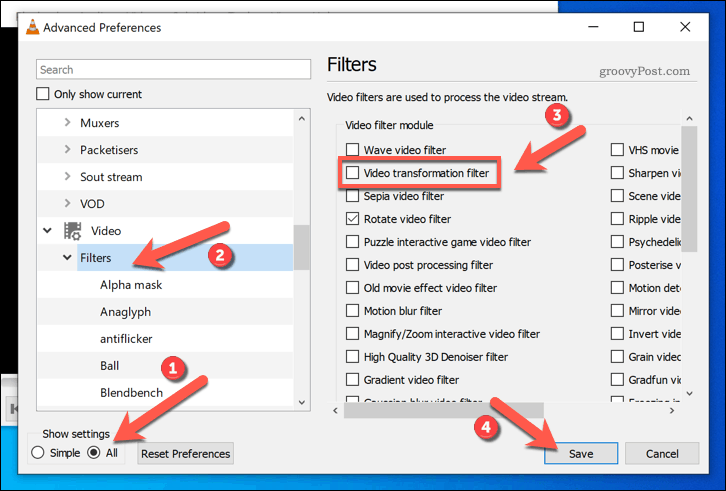
In the Advanced Preferences window, press the All radio button in the bottom-left corner, then press the Video > Filters options in the left-hand panel. On the right, click to enable the Video transformation filter setting, then press Save to save the setting.
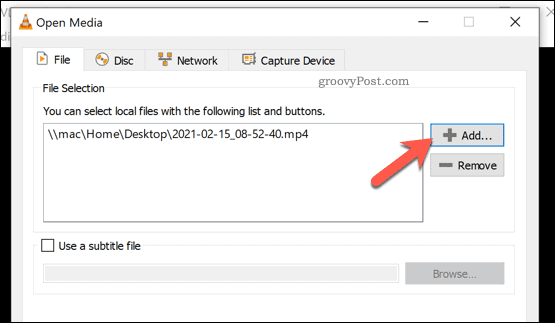
Enabling this setting allows you to save the rotation when you convert the video file. To do this, press Media > Convert Save. In the Open Media box, press Add to insert the video file you wish to rotate.
Click the Convert / Save button to proceed.
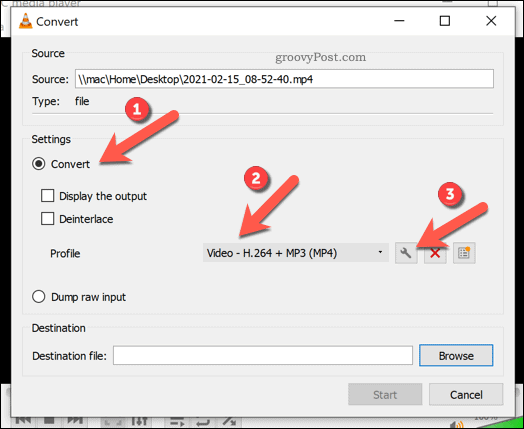
In the Convert options window, select the Convert option, then choose a video output format you’re happy with from the Profile options menu. Once you’ve done that, press the settings icon next to it (in the shape of a wrench).
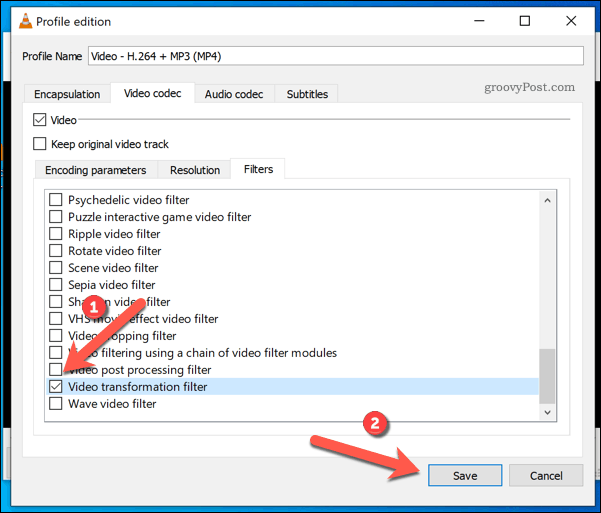
In the Video Codec tab, make sure to enable the Video checkbox. From the Filters tab, click the Video transformation filter option. This will ensure the rotation is applied to your video when the file is saved. Press Save to confirm your choices.
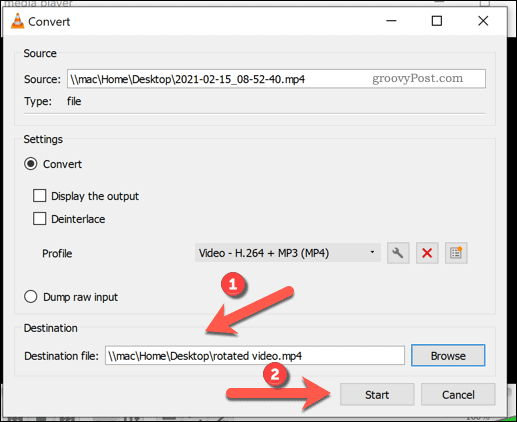
In the Convert window, confirm your output file and save location in the Destination file box, then press Start to save the file.
Allow VLC time to complete the conversion. VLC will save the file with the settings you provided, ensuring that the rotation set in VLC’s settings is applied to the video permanently.
On Mac
Unfortunately, it isn’t possible to save a rotation filter to a video permanently in VLC on Mac at this time. While you can enable the video transformation filter setting in the Preferences menu, VLC currently offers no way to permanently save this filter to your output file when you convert it. The only alternative for Mac users is to use a Mac video editing tool, such as iMovie, to rotate the video instead. You can also use various online services that allow for video rotation, although you should restrict using these to non-private videos. While most online services do suggest that they delete videos you upload for editing promptly, there are no guarantees, so caution is advised.
Becoming a VLC Power User
If you’re a VLC fan, the steps above can help you quickly rotate those badly-held camera snaps and line them up properly. You can use VLC for more than just media playback, however. You can use VLC to record your camera feed, making it perfect for video messages to friends and family. YouTube addicts can also use VLC to download YouTube videos straight to your PC or Mac for offline viewing. You can even use VLC to record your screen, capturing your display to share with others.
![]()

