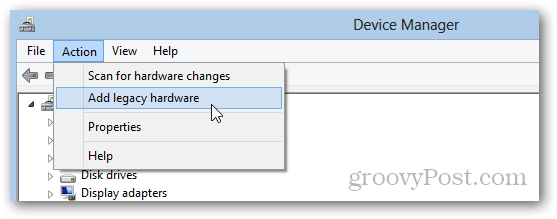
The short answer is that Microsoft has renamed it from “Microsoft Loopback Adapter” to “Microsoft KM-TEST Loopback Adapter.” So, if that’s the only hang up you’ve had, then go forth and install it the way you know how. If you still aren’t sure, here are the step-by-step instructions. Note: This also applies to Windows Server 2012. First, launch Device Manager (hit the Windows key and type “Device Manager”). Then, click Action –> Add legacy hardware.
In the Add Hardware dialog, click Install the hardware that I manually select from a list (Advanced) and click Next.
Choose Network adapters and click Next.
From the left-hand pane, choose Microsoft as the manufacturer. Now, select Microsoft KM-TEST Loopback Adapter. Click Next until finished.
And there you have it. For tips on using the Microsoft KM-TEST Loopback Adapter for network diagnostics and other tests…stay tuned! What do you use the Microsoft Loopback Adapter in Windows 8 for? Let us know in the comments. This thing saved my butt back when I was using Virtual PC 2007. It was literally the only possible way to get VM’s connected to the internet over a single wireless NIC. Comment Name * Email *
Δ Save my name and email and send me emails as new comments are made to this post.


![]()
