It’s pretty easy to track changes in a Word document, but if you want to compare the documents side-by-side, you’ll need to use Word’s built-in document comparison feature. Here’s how.
Comparing Two Microsoft Word Documents
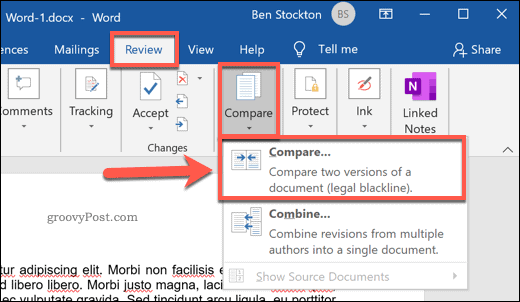
If you have two similar Microsoft Word documents, you can use the document comparison tool to compare them. This will point out any changes that have been made and merge them together, as well as allow you to view the two documents side-by-side. To do this, open Microsoft Word and press Review > Compare on the ribbon bar. From the Compare drop-down menu, press the Compare… option.
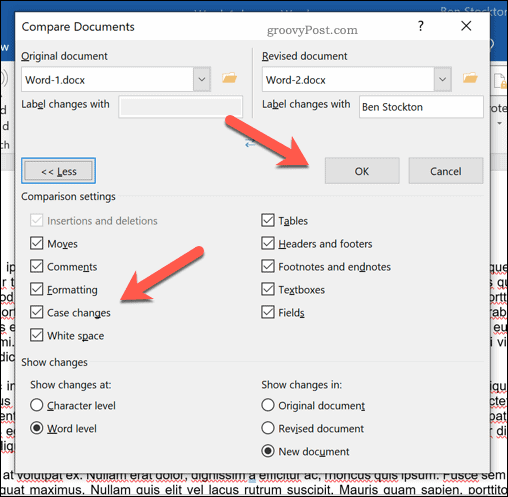
This will open the Compare Documents window. You’ll need to select the two Microsoft Word documents you wish to compare here. Select your two documents from the Original document and Revised document drop-down menus. Click Browse in the drop-down menus to select the files on your PC if they aren’t listed already.
With both documents selected, you can determine how you wish to label the changes. This will default to your standard document editing name. If you prefer, you can change this in the Label changes with box, underneath the Revised document drop-down menu.
Advanced Comparison Document Settings
Word will use default settings to compare your documents. If you wish to change these, click the More button in the bottom-left corner.
This will display various options you can use to compare your documents. These include changes to formatting, additional spaces, additions or deletions to the text, and more. Click the checkbox next to each comparion search option to enable or disable these criteria. Once you’re ready, press OK to begin the comparison.
Using the Document Comparison Overview
This will open a new window, allowing you to see how both documents compare to one another. A list of revisions will be shown in the left-hand panel, while the right-hand panel will allow you to scroll through and see the changes to each paragraph in both documents at once. The center document will show either the revised or original document, displaying any changes (with a red marker next to each change). Clicking on any of the changes will show the removed or changed text, with the updated text underneath.
You can switch between these views by selecting an option from the Tracking drop-down menu in the Review tab. For instance, choosing Original will show the original document in the center. If you choose Simple Markup, you’ll be able to view the changed text with a red marker, but not the deleted text. Choosing All Markup will display both the deleted and updated text, while No Markup will display the revised document in the center with no markers.
Merging Document Changes
If you want to merge the changes between two documents, you can use Word’s tracking features to do so. This allows you to copy the changes from the revised document into the original document. To do this, press the downwards arrow at the bottom of the Accept button, listed under the Changes section in the Review tab. You can accept each change individually (going through them one-by-one) or accept all of the changes at once. From the drop-down menu, press the Accept and Move to Next or Accept All Changes option, depending on your preference.
Once the changes have been accepted, you’ll need to save the file. To do this, press File > Save As. You can save the document as a separate, merged document. Alternatively, you can overwrite the first document to replace the original text, leaving only the combined document.
Better Document Creation in Microsoft Word
The best way to work on a team document together is to use document tracking. If you compare two Microsoft Word documents, however, you’ll be able to spot changes (or similarities) much clearly. This built-in comparison feature is just one way to create better Word documents. You can make longer documents easier to read by adding a table of contents, for instance. If you want to see how long it’s taking you to finish a document, you can track the editing time in Word in your document properties.
![]()


