Another way to merge your copy with your cowriters’ revised copies is to use the Combine documents feature. This allows you to view your original with revised versions and see the combined finished document. You can then save what you want from each as a new document. So let’s get to it! Here’s how to combine document revisions in Word.
Combine Versus Compare
Word offers two features that are similar, Combine and Compare. We’ll discuss the Combine feature here which is appropriate for document versions from multiple authors. Compare works better for comparing two documents and seeing what’s changed using a legal blackline option. To see how the Compare feature works, check out our tutorial for how to compare two Word documents.
Combine Documents in Word
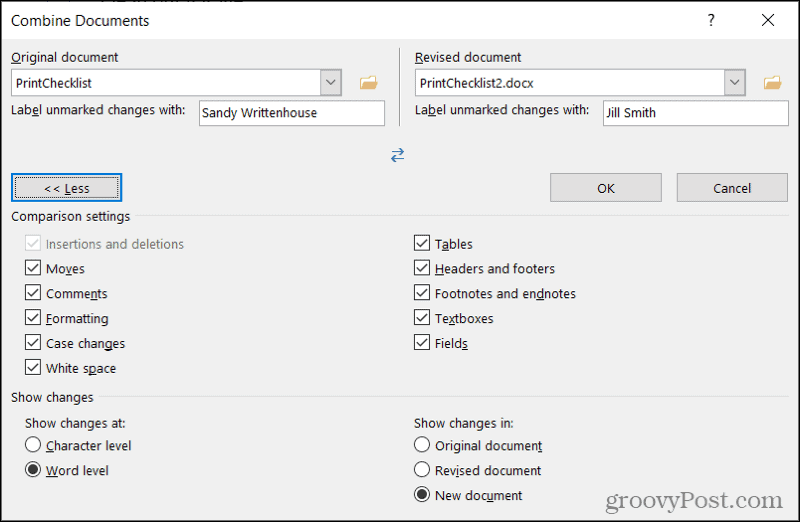
If you’re ready to get started with the Combine feature in Word, open a document to get started. This does not have to be one of the revisions you plan to use.
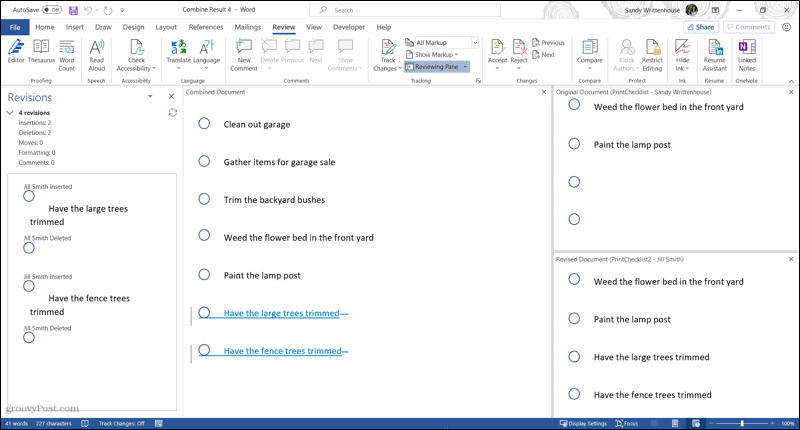
You’ll then see a four-part view of the results in a new document (Step 5 above).
Revisions: On the left are the revisions made and by whom. You can click the arrow next to the number of revisions for additional details.Combined Document: In the center is the combined document with all revisions marked.Original Document: On the top right is your original document with the file name and label.Revised Document: On the bottom right is the revised document with the file name and label.
If you use your mouse to scroll, you’ll see the Combined, Original, and Revised all scroll together. This lets you easily spot similarities and differences. You can also use the scroll bar within a single section to see only it.
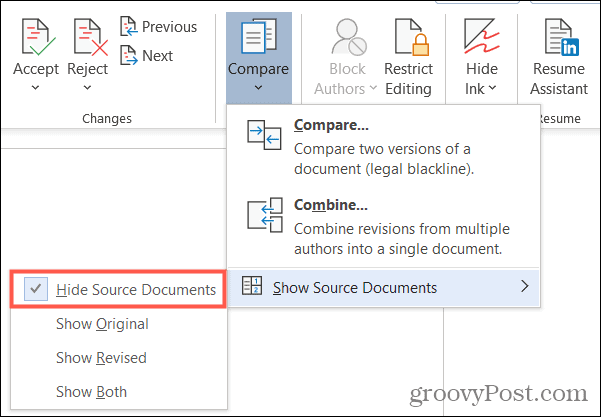
This can be a lot to take in at first. So if you prefer to remove the Original and Revised document sections on the right side, it’s easy. Access the Review tab again and click Compare in the ribbon. Next to Show Source Documents, choose Hide Source Documents.
You’ll notice that you can also choose to show only the Original or only the Revised if you like. When you hide the source documents, you’ll simply see the changes with vertical lines next to them. If you want to keep the revisions in the Combined document, open that Review tab once more and click Accept in the Changes section of the ribbon. You can use the drop-down box to move through each change individually or accept all changes.
And of course, if you don’t want to keep the changes, click the Reject button instead. Again, you can move through each change or reject them all.
Notes on Combined Documents
Since you picked New document for viewing the changes in Step 5 above, you’ll see the default document name as “Combine Result”. So, you can use Save As if you prefer a different name (File > Save As) or save it with the default name to continue working on it. You can only combine two Word documents at once using the Combine feature. So simply follow the same steps to combine additional versions with each saved combined document or the original per your preference.
Easily Combine Document Revisions in Word
While Track Changes is a wonderful Word feature, it’s not for everyone. And if you forget to enable it, or your cowriter forgets as well, things can get complicated. But with the Combine feature, you can not only see the differences in the revisions but turn them into one final merged document. For more on using Microsoft Word, take a look at how to track your editing time or how to rearrange pages.


![]()
