To help you better structure your next Microsoft PowerPoint presentation, we’ll show you how to align your slide elements. Whether images, objects, text boxes, or shapes, you can easily line them up perfectly. This gives your slideshow a neat, tidy, and, best of all, professional-looking appearance.
How to Automatically Align Objects in PowerPoint
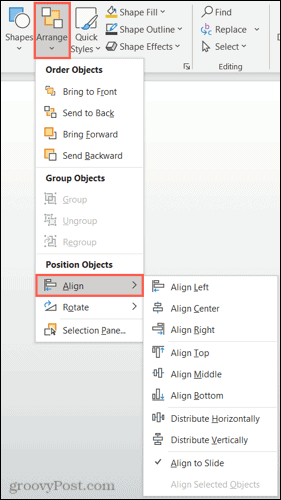
Positioning a single object is just as important as a group of objects. This individual element could be your focus point or the one you want to align other elements around. At the same time, you may have a few objects on your slide that you want to position in perfect alignment. To align a single object in an exact location on the slide, do the following.
At the top of the list, you have your horizontal alignments for left, center, and right. Next, you have vertical alignments for the top, middle, and bottom. If you are lining up a single element, you can combine these alignments for a precise location, such as top-center or bottom-left. If you are lining up a group of objects, you can also use the Distribute Horizontally and Distribute Vertically options. Each of these aligns the objects evenly spaced in whichever direction you select.
How to Manually Align Objects in PowerPoint
The automatic alignment options above give you quick and easy ways to line up your items. But you may need to make further adjustments or might prefer to line up your items manually. In these cases, you have a few PowerPoint features to help.
Use Smart Guides
Smart Guides appear without any setting adjustment in PowerPoint. You’ll see these handy guides appear as you move elements on a slide. And they not only help with alignment but with spacing as well. When you move an object, you’ll see the Smart Guides appear on all sides as you move. These Smart Guides can help you line up your element based on the left, right, top, or bottom, about other objects, and for even spacing.
Use Gridlines and Guides
You can also use adjustable guides as well as grid lines to line up objects. Go to the View tab, move to the Show section of the ribbon, and you’ll see checkboxes for both Gridlines and Guides. You can use one or the other, or both per your preference.
If you enable Gridlines, you’ll see these helpful lines appear on the background of the slide. Note that they do not become the background; they are only visible to help you layout your slide elements.
If you enable Guides, you’ll see black and red dotted lines appear. The black lines are the ones you can adjust. Place your cursor over one and when you see the two-sided arrow, drag it to the position where you want it. By adjusting the black lines to the red, you can more easily align your objects using both.
Align to Your Liking in Microsoft PowerPoint
Whether the automatic alignment options work perfectly for your slide or use a combination of the automatic and manual options, you have flexibility. The bottom line is that you can give the slides in your PowerPoint presentation an organized and well-thought-out appearance. For additional help preparing your slideshow, check out how to make a picture transparent or add captions to your PowerPoint images. Comment Name * Email *
Δ Save my name and email and send me emails as new comments are made to this post.
![]()


